Information Sheets
Step 1 - Day 1: Primary
- Sterilize and thoroughly rinse all equipment to be used at this time: primary pail, lid, bung, airlock, spoon, hydrometer and test jar.
- Add 2 litres warm water to the pail and gently add the contents of envelope #1 (bentonite finings) and stir in well. (Bentonite is an natural mineral product which assists in clearing your wine. It will not affect the wine's flavour.)
- Add the contents of the bag of concentrate to the Bentonite mixture in the primary pail. Add water, preferably filtered, distilled or spring water, bringing final volume to 23 litres or 6 US gallons. While adding water, allow it to splash to aerate the mixture. (Rinse bag with a portion of this water and add to pail.)
- Some styles of wine take oak for extra flavour. If you wish, add oak chips at this time by soaking them in 1 cup or 250 ml of boiling water for 10 minutes, then add oak and water mixture to primary pail and stir.
- Sprinkle the contents of packet of wine yeast over the wine's surface and stir vigorously for 2 minutes, or follow instructions on the yeast package.
- Measure the specific gravity ("SG"). It should be approximately 1.080 (between 1.075 and 1.085). Be certain to note the "SG" and date in the space provided.
- Cover pail with lid or plastic sheet. Store pail between 22°C - 25°C (72°F - 77°F). If needed, to help keep warm, use either a heat-belt or "brew-belt". Do not open or disturb the pail until step 2.
Step 2 - Day 7 (approx): First Racking
- Sterilize and thoroughly rinse all equipment to be used at this time: glass carboy, bung, airlock, siphon tube and hose, hydrometer and test jar.
- At this step, siphon (rack) your wine from the pail to your sterilized and rinsed carboy. The "SG" should be 1.020 or lower. If "SG" is not this low, replace the lid on your pail and check "SG" every 2 days. When ready, proceed to step 2C.
- Siphon wine to your sterilized carboy, allowing it to splash for a little "aeration". Transfer as much of the wine as possible at this stage. Tilt your pail by placing a book or small block under one side, siphoning from the lowest point. Fill the carboy to within 2" or 5cm from top and install airlock. If your carboy is not full, top it up with water (boiled and cooled, or RO water.)
- Now store your wine elevated at 22°C - 25°C (72°F-77°F.)
Step 3 - Day 18 (approx):
-
Sterilize and thoroughly rinse all equipment to be used at this time. At this step, your wine should have finished fermenting and have started to clear. The "SG" should be between .990 and .996. If the "SG" is higher, check weekly until it reaches this level, then continue to step 3B.
-
If you have a spare pail (or carboy) of the same size, siphon wine directly to this sterilized and rinsed pail (or carboy). Tilt the carboy to transfer as much wine as possible, but avoid transferring the deposit (sediment). Pour the contents of sachet #2 (metabisulphite & vitamin c) over the surface of the wine and stir vigorously for 2 minutes. These products are important, as they will assist your wine to age better by preserving it and preventing renewed fermentation.
-
Now siphon the wine back to your rinsed carboy (if necessary), filling it to within 3" or 8cm from the top and replace the airlock. If necessary, top up with water (boiled and cooled, or RO.)
-
During the next 3 days, stir the wine vigorously 2-3 times daily for 2 minutes with the handle of your sterilized and rinsed spoon. This stirring will remove dissolved C02 gas from the wine. You may wish to use a convenient time-saving device called a wine agitator which attaches to the end of an electric drill. It is inexpensive and makes this task very easy. See your retailer for this item.
-
Once you have degassed your wine, pour in the contents of package #5 (Flokul30*) and stir thoroughly. Wait 15 - 30 minutes and then add the contents of package #6 (Chitek*) and stir for 2 minutes. Place the wine in a cool area at 15°C - 18°C or 60°F - 65°F. This lower temperature is important for your wine to clear quickly for bottling. Note that at warmer temperatures your wine may clear more slowly.
-
Your wine should be clear and show no signs of fermentation. If the wine is not clear, DO NOT bottle it, as it is not yet ready. Occasionally wines may take a little longer to clear due to temperature differences. This is normal. Leave it in the carboy and check it every week until it is clear.
-
If you like a sweeter wine, dissolve package #4 (sorbate) in a little warm water and add. This helps to prevent fermentation in the bottle. Then add wine conditioner to taste, a little at a time so as not to over sweeten.
-
Filter if you wish at this time. (Recommended if you have added conditioner, so as to avoid cloudiness)
-
Remember to sterilize and thoroughly rinse equipment to be used at bottling time, including your bottles.
Step 1
Remove yeast from under cap, place malt container in the sink filled with hot water. Let rest for 15 minutes, wash all equipment that will come in contact with the beer with sterilizing solution and rinse well. Place 6 cups of dextrose sugar or 1.25kg of hi-malt syrup (a better product, gives more body and a creamier head) in your primary fermenter. Add beer malt and 4 cans of hot water. Mix well. Fill fermenter with cold water up to the 5-gallon mark. After mixing well, place sterilized hydrometer in primary fermenter. The reading should be around 1.035 S.G. for 5% content. Place primary fermenter in warm area (21-23 degrees C). Sprinkle yeast on top and cover.
Step 2
After 5-7 days the foam should have subsided. It is now time to transfer the contents into your carboy. Sterilize your siphon hose, carboy, airlock and bung. Without disturbing the sediment, syphon the contents of your fermenter into your carboy to within inches of the top. Half fill the airlock with water or sterilizing solution and insert into the mouth of the carboy. Set aside.
Step 3
After 15-20 days sterilize your hydrometer and measure your specific gravity using a test jar or wine/beer thief. Beer should be at 1.004 S.G. or less with no bubbles passing through the airlock. Clean and sterilize primary fermenter, syphon hose, and bottles. Again without disturbing the sediment, syphon the contents into the primary. Gently stir in one to 1 - 1½ cups dextrose into the beer. Now syphon the beer into your bottles leaving ¾ to 1 inch of headspace and cap. Store upright at room temperature for two weeks and then move to a cool area
Step 4
It is now time to try the fruits of your labor. Take a chilled bottle and pour carefully (avoid disturbing sediment in the bottom) into your favorite mug. Take the time to rinse your bottle out now to save time later. Sit back and enjoy. Your beer will improve with every passing day, so try to be patient!
Flash Sterilization or Pasteurization?????
What is the difference?
Why are Mosto Italiano and FC Collection better??
We would like to underline a couple of aspects regarding the production process of our juices and the impact on the quality of a wine kit as opposed to other methods used in the current market.
| STERILIZATION | PASTEURIZATION |
|---|---|
| Higher temperature | Lower temperature |
| Shorter contact time + aseptic filling | Longer contact time |
| Low impact on the product | Deterioration of the product |
| Longer shelf life | Shorter shelf life |
| Sterilization kills ALL microorganisms |
Mosto Italiano / FC Collection are STERILE juices.
This means that the juice (after the stabilization process) is filtered. In our high tech plant, after filtration, the juice is flash sterilized and immediately aseptically packaged without ever coming in contact with air.
Filtration is the first step in order to remove impurities, bacteria and wild yeast. Then we proceed to sterilize the product at high temperatures for a short contact time (meaning seconds - for this reason it is referred to as “flash”). Sterilization kills any microorganisms present (including cells and spores) – and the product, once sterile will be sterile forever up to the point of the opening of the package.
The process is flash in order to preserve the flavour, taste and aroma of the juices.
In short terms it is this process that allows Mosto Italiano and FC Collection to keep the aroma, flavour and taste of the premium juice we use. Further it is possible to enjoy a top quality product that can be kept at room temperature, (so avoiding all costs and difficulties involved with cold storage).
Another aspect that it is important is colour: you probably notice that our white products are generally pale white / yellow and our reds are red-brownish, (like by the way they should be). This is thanks to our process that allows a better preservation of the product and doesn’t burn it.
Furthermore the sterilization brings to zero any risk of fermentations of the bag, and allows a better and safer fermentation, when needed, because any eventual wild yeast has been killed. This means it improves indefinitely the shelf life. Competitions product (ex. Vinterra or Bolero pail): “juice and / or concentrate” are listed in the ingredients that become a pasteurised must.
The pasteurisation is a process that is overcome in the food industry compared to the sterilization: the temperatures are usually lower but the product is under heating for long time (not seconds like the flash sterilization). Second, the pasteurisation REDUCES THE MICRO-ORGANISM BUT DOESN’T KILL ALL OF THEM. So a product that is pasteurised in not sterile at all and can have micro-organisms that can develop a second time.
Further to this, the long contact time burns the aromas and gives the taste of a typical “cooked aftertaste”. In the case of a wine kit another negative effect is on the colour – the colour will change very quickly with age giving to the white the typical gold/brownish tone and in the red the flat/brownish tone that has nothing to do with a real wine.
This means in short terms that whatever raw material you use – juice or concentrate or both – the pasteurisation process would have a heavy and negative impact on it. This would also become worse and worse with the passing of time. To make an example outside of this industry, make a comparison between an orange juice done with pasteurization and an orange juice that is done with UTH. You will taste the difference!!!! Why are we the only company so far with a sterilization and aseptic filling system in the industry? There are more than one million good reasons for that!!!!!!
Some aspects of the wine community are strictly about appearance. Labels do not affect the flavor of a wine at all, yet they can often be a big part of the purchase decision. Large, sleek wineries might churn out mediocre wines, while small, back yard plots create the nectar of the gods. It is in this vein that the process of cold stabilization was born - a superficial process whose sole purpose is to make a wine "look" better. The purpose behind cold stabilization is to remove all tartrate crystals from a wine during its fermentation stage. Tartrate Crystals are also called "wine diamonds". They are a natural product of the wine, and form when the wine gets too cold. It is in essence cream of tartar, forming because of the temperature change. Think of sugar turning into rock candy and you'll have a good mental image.
Tartaric acid is a normal grape acid. Potassium also exists in grapes, and when these two things bind together under chilly conditions, they form little potassium bitartrate crystals, which then settle to the bottom of the bottle. They're completely harmless, and quite natural. The problem, of course, is with appearances.
While in Europe these crystals are accepted as a sign that the wine is a natural one, and even appreciated, Americans are used to wine being clear, pure, filtered, processed and de-sedimented. Consumers often panic when they see little crystals in their Chardonnay, thinking they are impurities or even bits of broken glass. They often refuse to drink the wine and return it to the winemaker (who promptly serves it to his own family). Cold Stabilization is a way to prevent these returns from happening.
How is Cold Stabilization Done?
Since the tartaric acid and potassium are natural components of grapes, they cannot really be removed. To make sure crystals don't form in the consumer's home, therefore, the winemaker forces all crystals to form at the winery.
Usually the main stainless steel fermentation vessel for the wine has a cooling system on it. After the fermentation is complete, that vessel is plunged to near-freezing for 3 to 4 days to force the crystals to form. The crystals stick to the sides of the vessel, and when the wine is then removed, the crystals remain behind. Some winemakers argue that a portion of the flavor and uniqueness of the wine remains behind as well.
Cold Stabilization is normally only done to white and blush wines. This isn't because red wines do not form crystals - any wine will form crystals, since every wine is made from grapes containing the ingredients for crystals. However, since crystals only form when a wine gets very cold, red wines rarely show crystals, since red wines are served at a relatively warm temperature. They should never reach that cooler, crystal-forming temperature.
How do I Serve a Wine with Crystals?
Crystals are just like any other natural sediment. Stand the wine bottle upright for a few hours, to allow the sediment to settle into the bottom of the glass. Then decant the glass into another container, being careful not to let the sediment go into the decanter. The crystals are not harmful in any way.
Sodium Metabisulfite vs Sparklebrite (chlorinated trisodium phosphate)
Sodium Metabisulfate:
- White powder (smelly stuff) or Campden tablets.
- Mixed with water (50 grams per gallon), it produces sulphur dioxide gas (SO2 - smelly stuff)
- Use to sanitize equipment – pails, hoses, carboys, bottles, spoons, corks, etc
- If your equipment is clean, it only needs to be sanitized, so use metabisulfite.
- Gas may be used to maintain corks in a sterile condition (see sheet on corks)
- Effective against bacterial infection
- Used to sterilize fresh fruit or grapes before making wine
- Effective for 24 hours when used in this way – add yeast only after 24 hours
- Small amounts are added to wine kits or 1 Campden tablet per gallon of fresh juice wine prior to clearing in order to inhibit yeast and to promote clearing. Helps prevent oxidation.
- The liquid can be reused as long as the sulfur dioxide gas is still produced. ie as long as the solution is “smelly”. DO NOT SMELL DEEPLY
- Can provoke allergic reactions if breathed.
Sparklebrite (chlorinated trisodium phosphate) – PINK cleaner
- Mix only in recommended proportions: 1 teaspoon per gallon. There is no point is making a stronger solution. It will not work any better.
- Do not reuse. Unlike sodium metabisulfite, Sparklebrite is a one use solution.
- Bottles and equipment washed with Sparklebrite are sterilized
- DO NOT USE TO STERILIZE CORKS
- The TSP ensures that Sparklebrite is a very effective cleaner – soak very heavily soiled bottles or equipment overnight, then use a bottle brush to remove excess grime and dirt. RINSE VERY THOROUGHLY. Wine does not react well to chlorine.
- Splashes may bleach clothing.
- If splashed in the eyes or on the skin, flush thoroughly with water.
- If splashed in the eyes, seek prompt medical attention.
- Corrosive dangerous gas is formed if mixed with acid, or with toilet bowl cleaner, rust remover, household ammonia or acid.
Are GMO's a cause for concern?
What is Genetic Engineering?
Genetic engineering is a laboratory technique used by scientists to change the DNA of living organisms. DNA is the blueprint for the individuality of an organism. The organism relies upon the information stored in its DNA for the management of every biochemical process. The life, growth and unique features of the organism depend on its DNA. The segments of DNA which have been associated with specific features or functions of an organism are called genes. Molecular biologists have discovered many enzymes which change the structure of DNA in living organisms. Some of these enzymes can cut and join strands of DNA. Using such enzymes, scientists learned to cut specific genes from DNA and to build customized DNA using these genes. They also learned about vectors, strands of DNA such as viruses, which can infect a cell and insert themselves into its DNA. With this knowledge, scientists started to build vectors which incorporated genes of their choosing and used the new vectors to insert these genes into the DNA of living organisms. Genetic engineers believe they can improve the foods we eat by doing this. For example, tomatoes are sensitive to frost. This shortens their growing season. Fish, on the other hand, survive in very cold water. Scientists identified a particular gene which enables a flounder to resist cold and used the technology of genetic engineering to insert this 'antifreeze' gene into a tomato. This makes it possible to extend the growing season of the tomato. At first glance, this might look exciting to some people. Deeper consideration reveals serious and unknown dangers.
Here is an example of how rapidly the use of Genetically Engineered crops are growing:
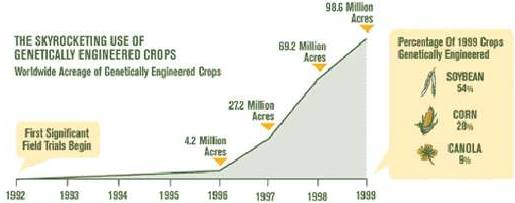
You are eating genetically engineered food. Is it good for you? Do you have a choice?
Genetic engineering is the largest food experiment in the history of the world. We are all the guinea pigs. There are about 40 varieties of genetically engineered crop approved for marketing in the U.S. As a result, 60- 70% of the foods you eat and the beverages you drink contain genetically engineered (GE) components. Genetically engineered foods contain substances that have never been a part of the human food supply. They are not subjected to rigorous pre-market safety testing. And THEY ARE NOT LABELED. Is genetic engineering safe for consumption? Safe for the environment? Safe for the future of mankind? No longterm studies have been done. As of yet, no one can answer these questions. Do you want out of the experiment? Start by opting to purchase food and beverages that are certified to be G.M.O. FREE, (such as Advintage wine kits).
What do Scientists Say about the Dangers of Genetic Engineering?
Dr. John Fagan (Professor of Molecular Biology, Maharishi University of Management; President, Genetic ID) “When genetic engineers disregard the reproductive boundaries set in place by natural law, they run the risk of destroying our genetic encyclopedia, compromising the richness of our natural biodiversity and creating ‘genetic soup.’ What this means for the future of our ecosystem, no one knows.”
Dr. John S. Hagelin (Professor of Physics, Maharishi University of Management Presidential Candidate, The Natural Law Party) “The fact is, it is virtually impossible to even conceive of a testing procedure to assess the health effects of genetically engineered foods when introduced into the food chain, nor is there any valid nutritional or public interest reason for their introduction.”
Dr. Richard Lacey (Professor of Food Safety, Leeds University, UK) “Genetic engineering bypasses conventional breeding by using artificially constructed parasitic genetic elements, including viruses, as vectors to carry and smuggle genes into cells. Once inside cells, these vectors slot themselves into the host genome. The insertion of foreign genes into the host genome has long been known to have many harmful and fatal effects including cancer of the organism.”
Professor Mae Wan-Ho (Department of Biology, Open University, UK) “In 1983, hundreds of people in Spain died after consuming adulterated rapeseed oil. This adulterated rapeseed oil was not toxic to rats.”Dr. Parke warns that current testing procedures for genetically altered foods including rodent tests do not prove safety for humans. He has suggested a moratorium on the release of genetically engineered organisms, foods, and medicines.
Professor Dennis Parke (School of Biological Sciences, University of Surrey, UK) “Genes encode proteins involved in the control of virtually all biological processes. By transferring genes across species barriers which have existed for eons between species like humans and sheep we risk breaching natural thresholds against unexpected biological processes. For example, an incorrectly folded form of an ordinary cellular protein can under certain circumstances be replicative and give rise to infectious neurological disease.”
Dr. Joseph Cummins (Professor Emeritus of Genetics, University of Western Ontario) “We see this as a multi-million dollar problem. In Europe, there is already a big problem with gene flow between wild beet and cultivated beet. Oil-seed rape (canola) also has close relatives and is going to cause problems in the future. One would expect that the kind of genes that are now being engineered are going to be the ones that have a higher potentiality for causing trouble.”
Dr. Norman Ellstrand (Professor of Genetics, University of California) “The generation of genetically engineered plants and animals involves the random integration of artificial combinations of genetic material from unrelated species into the DNA of the host organism. This procedure results in disruption of the genetic blueprint of the organism with totally unpredictable consequences. The unexpected production of toxic substances has now been observed in genetically engineered bacteria, yeast, plants, and animals with the problem remaining undetected until a major health hazard has arisen. Moreover, genetically engineered food or enzymatic food processing agents may produce an immediate effect or it could take years for full toxicity to come to light.”
What does “food grade” mean? : All food products have to be certified by the “Food & Drug Administration” to be “food grade” and deemed safe. Unfortunately in products such as wine kits that are comprised from a variety of raw materials some manufacturers use components which are not certified to be “food grade”. Would you buy a pack of frozen vegetables if you knew that they were treated with aluminum? Of course not! So why would you want to buy a wine kit including these kinds of ingredients? How does this affect the consumer? At this point there is no way to know the long term affects. But as they saying goes, “It’s better to e safe than sorry”!
- At Advintage EVERY raw material, micro ingredient and add pack ingredient are certified “food grade”.
- At Advintage EVERY raw material, micro ingredient and add pack ingredient are certified “G.M.O free”.
- Advintage has the ONLY wine kits on the market that claim these two “Advantages”.
FILTER PAD DIRECTIONS
- The #1 pads are a coarse pad, mainly used for heavy wines. These pads will produce minimal clarity in the wine. They are used as a first filtration to extract the larger suspended particles.
- The #2 pads are finer, and are used for the brightening and polishing of the wine. You should notice a brightness and clarity. These pads remove smaller suspended particles and are used for second filtration.
- If you prefer to further enhance the wine or if you plan on bottling, use our #3 pads. These pads should only be used after your wine has been filtered with our #2 pads at least once. The #3 pads assist in removing higher quantities of the yeast in the wine.
- NOTE: One set of pads should effectively filter 23 liters (5 gallons) of wine. Remove the pads and replace with a new set after above mentioned quantity use. Discard after use.
- If you have additional wine to be filtered you must allow the motor to cool for 45 - 60 minutes before recommencing filtration.
FILTER SET-UP
It is very important to follow these instructions.
Important: Do not let the pump run dry. Wine must be racked or decanted at least once during the normal process of winemaking. Note: Prior to filtering, rack your wine into a new container.
INSTRUCTIONS FOR USE
- Use the proper pads as per pad directions.
- Remove the pads from the package and place them in a clean container with enough fresh water to cover the pads and allow them to soak for approximately 1 minute. Make sure the pads are not bunched together while soaking, allow the water to saturate on both sides of the 3 pads.
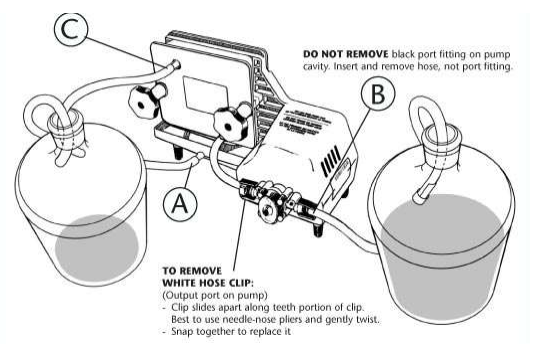
- Attach the small diameter piece of hose supplied to the fitting located under the drip tray (A on diagram). This same hose may be used for racking and cleaning your pump.
- Loosen the two black hand wheels and remove the two central plates.
- Remove the pads from the water and begin inserting them into the filter body. The coarse side will be facing the handwheels and holes will be aligned (see diagram). The pads have a tight fit. Make sure to press down on the pad so that both sides of the "T" are sitting on the two side bolts and the pad is straight along the top. Place the pad into the filter body, next place one of the central filtering plates, insert the second pad and the next platen the same manner, followed by the last pad. Once the pads and plates are inserted, all the pads and the plates should be even around the top. Note: The pads are cut in a "T" formation with one side of the "T" higher than the other. The hooks on both sides of the filter plates also have the same offset. This allows you to insert the pads and plates properly.
- Tighten the hand wheels to ensure a tight seal on the pads.
- Insert the intake hose, which contains a stainless steel wire and an anti sediment tip into the inlet on the pump (B on the diagram).
- Insert the long, slightly larger diameter outtake tube into the exit nozzle (C on the diagram).
- Place the intake hose into the wine to be filtered. Next place the outtake tube and the small tube attached to the drip tray into the container which will hold the filtered wine. If you desire, you may place the tube attached to the drip tray into a separate container and refilter this wine at the end.
- You are now ready to filter. Plug in the cord and turn on the switch located at thereat of the filter. Important: The first liquid to come out of the drainage tube (C in diagram) will be the water being pushed out of the pads. Allow this water to flow out and discard before placing the drainage tube in the clean housing container.
- The pump may initially be dry, and will not draw the wine quickly. If this happens force some wine into the pump using the intake tube.
- For your convenience you may use the pump for racking. For setup, follow the same directions as suggested for cleaning the pump (bypassing the filter plates).Warning: this feature must not be used if there are solids in the wine, i.e. oak chips, elderberries, etc. warranty will be void.
MAINTENANCE
When you have finished, clean the pump. It is important to keep your filter clean.
- Remove the short tube which had been placed on the fitting under the drip tray. Disconnect the short tube which leads from the pump to the first filtering plate and attach the drip tray tube (A in diagram) to the outlet portion of the pump, leaving the intake tube connected to the pump. You now have a direct line through the pump, bypassing the filter plates. Pump clean cold water through the pump. Place the intake tube into approx.15 liters or 3 gallons of clean water and the outtake tube into an empty container. Turn on the pump, allowing the clean water to flush out the pump.
- Turn off and unplug the cord.
- Turn off and unplug the cord.
- Remove the filtering plates and hoses and clean. When cleaning the drip tray be very careful. Do not allow any water to get into the motor section.
- From time to time, place some petroleum jelly on the threaded portion of the two side bolts, keeping them lubricated.
- See our website trouble-shooting page www.buonvino.com
SUGGESTIONS FOR GOOD FILTRATION
Filtration is the last step in wine making. Its purpose is to farther clarify and help remove unnecessary by-products and a high percentage of yeast in the wine. In order to achieve optimum results we suggest that a waiting period of at least 5 days must elapse between filtrations as you progress to tighter (lower micron size) pads. To further enhance and maintain the wine, it should be properly balanced and stabilized before filtering. Use a commercially accepted stabilizer like TANNISOL, which contains the proper percentages of products in combination form and simplifies the process of wine stabilization. (Follow proper directions.)The Buon Vino Filter Pads, Tannisol or any necessary product and instructions can be obtained from the same retailer.
THE FOLLOWING SUGGESTIONS AND RECOMMENDATIONS ARE MADE AVAILABLE TO THE HOME WINE MAKER TO OBTAIN THE BEST RESULT IN WINE MAKING AND FILTERING WITH THE BUON VINO SUPER JET
Filtration is the last step in wine making, Just as you take precautions while you are fermenting and preparing your wine, filtration also required some basis of understanding. A young wine (30 days old) is not ready for FINE filtration. As per our instructions and wine making directions this is the racking and maturing stage for the wine.
- If you are using gelatine and or bentonite in your wine and if these products have not settled sufficiently, this will cause a coating effect on your pads. You may experience hack pressure, which may cause excessive leakage and or slower output.
- FOR BEST RESULTS: Wine should be 2-3 months old and kept in as cool a spot as you have in you home prior to filtration. During this time the wine will mature, achieve better body and allow the suspended particles and products to drop naturally. At this stage you may proceed to filter with the #2 pads to achieve the shine and sparkle in your wine. You then may follow up with our #3 pads. For better results allow 2-4 days between filtrations.
- If you wish to filter a young wine (30 days old) we recommend using #1 pads first. You may filter with the #2 pads immediately after filtering with the #1 however the wine is in an agitated state and it would be advisable to wait 2-4 days between filtrations. You may then follow with the #3 after 2-4 days.
- A young wine that is being filtered may come through the unit agitated, due to a high content of CO2 that may be present in the wine during fermentation, this is normal. Continue filtering into your clean container. Within 10-15 minutes your wine will stabilize and you will seethe clarity achieved in filtering.
- We do not recommend bottling your wine directly from the filter; you should filter from carboy to carboy. Your wine is being pumped through the filters and is in an agitated state and should not be bottled as such. Allow your wine to rest for a few days before you bottle. Wine should be bottled using proper bottling equipment. These are some recommendations provided to the home wine maker by BUON VINO, to help you achieve better results in your winemaking and filtering.
FOR FURTHER INFORMATION ABOUT WINE MAKING AND FILTERING CONSULT WITH YOUR HOME WINE MAKING RETAILER.
IMPORTANT SAFEGUARDS
Read all Instructions and safeguards.
The following basic safety precautions apply when using electrical appliances:
- Do not touch surface that may be hot. Use handles or knobs provided.
- To protect against electrical shock, do not immerse cords, plugs, portable appliances (or other specific part or parts) in water or other liquid.
- Close supervision is necessary when any appliance is used by or near children.
- i. Portable - Remove plug from outlet when appliance is not in use, before putting on or taking off parts and before cleaning.
- ii. Permanently installed - Make sure appliance is OFF when not in use, before putting on or taking off parts and before cleaning.
- Portable - Do not operate any appliance with a damaged cord or plug, or after the appliance malfunctions or is dropped or damaged in any manner. Return appliance to the nearest authorized service facility for examination, repair or electrical or mechanical adjustment.
- The use of accessory attachments not recommended by the appliance manufacturer may cause injuries.
- Do not use outdoors (this item may be omitted if the product is specifically intended for outdoor use).
- Do not let cord hang over edge of table or counter or touch hot surfaces.
- Do not place on or near a hot gas or electric burner or in a heated oven.
- Where applicable, always attach plug to appliance and check that the control is OFF before plugging cord into wall outlet.
- Do not use appliance for other than intended use.
- Avoid contacting moving parts.
- NEVER dismantle motor - call before touching any motor parts.
LIQUID MEASURE
1 Imp. gal. = 160 Imp.Fl oz = 1.2 U.S. gal. = 4.546 litres
1 U.S. gal. = 0.833 Imp. gal. = 3.785 litres = 4 U.S. quarts = 128 U.S. fl. oz. = 8.34lb.water.
1 Imp. fl.oz. = 0.96 U.S. fl. oz. = 28.4ml
1 U.S. fl.oz. = 2 level tablespoons = 6 level teaspoons = 29.6ml
1 U.S. quart = 2 pints = 4 cups = 32 fl. oz. = 0.946 litres
1 U.S. pint = 16 U.S. fl.oz. = 2 cups = 32 tablespoons = 0.473 litres
1 U.S. tablespoon = 3 U.S. teaspoons = 15 grams (approximately) = 15ml = ½ oz
1 U.S. cup = 8 fl. oz. = 16 tablespoons = 48 teaspoons = ½ pt. = 237 ml
1 Litre = 1000ml = 0.220 gal. = 0.880 quart
1 teaspoon = 1/16 oz = 5 gms = 5 ml
1 tablespoon = 15 ml = 3 teaspoons
SUGAR AND DRY MALT (volume)
Dry malt extract measures the same as corn sugar.
1 lb Corn Sugar (Dextrose) = 3 Imp. cups = 2 4/5 Metric cups = 2.4 U.S. cups.
1 lb Cane Sugar (Table) = 2 ¼ Imp. cups = 2 1/5 Metric cups = 2 U.S. cups = 8 oz. = ½
lb
1 oz Cane Sugar = 2 level tablespoons
1 kg Corn Sugar (Dextrose) = 6 Metric cups
1 kg Cane Sugar = 5 Metric cups
DRY MEASURE (weight)
1 pound = 16 ounces = 453.4 grams
1 ounce = 28.4 grams
1 kilogram = 1000 grams = 35.3 ounces = 2.205 pounds
1 gram = 0.035 ounce
To change ounces to grams multiply by 30.0.
To change pounds to kilograms multiply by 0.45.
VOLUME MEASURE
1 tsp. = 5 ml
1 tbsp. = 15 ml
1 Imp. cup = 8 oz
1 Metric cup = 250 ml
To change:
Teaspoons to millilitres multiply by 5.0
Tablespoons to millilitres multiply by 15.0
Fluid ounces to millilitres multiply by 30.0
Cups to litres multiply by 0.24
Pints to litres multiply by 0.47
Quarts to litres multiply by 0.95
ALCOHOL BY WEIGHT OR VOLUME
Alcohol by weight equals alcohol by volume x 0.8.
Alcohol by weight equals alcohol by weight x 1.25.
TEMPERATURE
To convert Fahrenheit to Celsius:
(Degrees Fahrenheit - 32) /1.8 = Degrees Celsius
To convert Celsius to Fahrenheit:
(Degrees Celsius x 1.8) + 32 = Degrees Fahrenheit
| Celsius | Fahrenheit |
| 15 | 59 |
| 16 | 60.8 |
| 17 | 62.6 |
| 18 | 64.4 |
| 19 | 66.2 |
| 20 | 68 |
| 21 | 69.8 |
| 22 | 71.6 |
| 23 | 73.4 |
| 24 | 75.2 |
| 25 | 77 |
| 26 | 78.8 |
| 27 | 80.6 |
| 28 | 82.4 |
| 29 | 84.2 |
| 30 | 86 |
| 31 | 87.8 |
| 32 | 89.6 |
| 33 | 91.4 |
| 34 | 93.2 |
| 35 | 95 |
| 36 | 96.8 |
| 37 | 98.6 |
| 38 | 100.4 |
| 39 | 102.2 |
| 40 | 104 |
How to prepare your corks for bottling:
1. If you are using a high-quality floor corker there is no need to soak or sulfite any corks. Simply insert them dry. (NB: see note about dry corks below) However, a quick dip in sulphite solution and an equally quick rinse is OK also.
2. If you have difficulty inserting long corks, give them a quick dip or rinse in sulphite (NOT PINK CHLORINATED) solution and then put them in warm water while you are bottling. This is usually sufficient to ensure smooth insertion.
3. If you are using a small, hand-held corker (single or double-lever types) you may need to prepare your corks by rinsing them in Sulphite solution, then soaking them in warm water for up to 15 minutes (5 minutes is often enough for short corks). If you have trouble getting corks to pass through your hand-held corker, you may want to try adding ½ cup of glycerin to every four liters of warm water that you use for soaking. This ensures that the corks get enough moisture to lubricate their passage through the corker, but they won't be over soaked and crumble.
While some books talk about boiling and long soaking in sulfite solutions, these are very bad ideas. Cork is tree bark, and boiling it turns it to mush. Mush won't seal your bottles. Long soaking does the same thing. Once you have opened a bag of corks, you may need to take special care of the unused corks.
DRY CORKS
The trouble with handling very dry corks is that it's tough to judge how long you can soak them before they become mushy. However, there is a nifty technique that you can take advantage of, if your corks are brittle either from age or low humidity storage. This is also a convenient way to store any excess corks that you may have, and you will always be ready to cork. You can construct a 'cork humidor'.
You will need a sanitized plastic bucket and lid, an empty wine bottle, and a 1.25% solution of metabisulphite (eight teaspoons of metabisulphite powder dissolved in a gallon of cool water). Fill the wine bottle halfway with the solution, and carefully stand it up in the bottom of the bucket. Gently pour your corks into the bucket, filling the space around the bottle, and put the lid on tightly. Leave the bucket in a room temperature area for about a week. In that time the liquid evaporating from the wine bottle will raise the humidity in the bucket in turn raising the humidity in the corks, making them pliant enough for easy insertion. The sulfur dioxide gas coming off the liquid will prevent the growth of moulds or spoilage organisms, keeping the corks sanitary. No further treatment of the corks will be necessary before bottling.
If you want to store your corks this way, replace the solution in the bottle every four weeks, and keep the lid tightly sealed. That way your corks will always be ready for use. We currently stock several grades or types of corks for the amateur winemaker:LONG TERM STORAGE CORKS:
1. Thermoplastic #9 long artificial corks (5+ years)
One of the latest developments in corking. No off-tastes.
Do not dry out.
Sterilize, rinse & cork. Floor corker recommended. NO SOAKING NECESSARY.
Can be stored in any position immediately – upright or lying down.
Sold in bags of 30, 60, 90 & 1000.
2. Synthetic #9 long Corks (5+ years)
One of the latest developments in corking. No off-tastes.
Do not dry out.
Sterilize, rinse & cork. Floor corker recommended. NO SOAKING NECESSARY.
Can be stored in any position immediately – upright or lying down.
Sold in bags of 30, 60, 90 & 1000.
3. Natural Winery Grade #9 long Corks (Up to 5 years or more)
Cut from the best bark of the cork tree.
Sterilize in sulphite solution, rinse & cork. Floor corker recommended. Dry
insertion or minimal soaking time.
Store for 3 - 5 days upright after corking, then lay down.
Sold in bags of 30, 60, 90 & 1000.
4. Natural #9 Long (2 – 3 years)
Sterilize in sulphite solution, soak in warm water for 5 – 15 minutes
Floor corker recommended. Dry insertion or minimal soaking time.
Store for 3 - 5 days upright after corking, then lay down
Sold in bags of 30, 60, 90 & 1000
5. Agglomerate #9 Long Corks (2 – 3 years)
Sterilize in sulphite solution, soak in warm water for 5 – 15 minutes
Floor corker recommended. Dry insertion or minimal soaking time.
Store for 3 - 5 days upright after corking, then lay down
Sold in bags of 30, u-bag (any quantity), 1000
SHORT TERM STORAGE CORKS:
6. Natural #9 Short Corks (Up to 15 – 18 months)
Dry insertion or minimal soaking time.
Sterilize in sulphite solution, soak in warm water for 5 – 15 minutes.
Store for 3 - 5 days upright after corking, then lay down
Sold in bags of 30, u-bag (any quantity), 1000
7. Agglomerate #9 Short Corks (Up to 15 – 18 months)
Dry insertion or minimal soaking time.
Sterilize in sulphite solution, soak in warm water for 5 – 15 minutes
Store for 3 - 5 days upright after corking, then lay down
Sold in bags of 30, u-bag (any quantity), 1000
Degassing your wine properly is a very important step in wine making. We all know that it is yeast that causes wine to ferment, but how does this happen? Yeast needs two things to survive; oxygen and sugar. (Sugar is naturally present in all grape juice and grape juice concentrates). Providing these two items are present, your yeast will go to work transforming the natural sugars in your grape must into alcohol. During this process one of the by-products is carbon dioxide (CO2, also commonly know as “gas”). If you do not properly “degas” your wine before bottling you will end up with a carbonated wine, which will most definitely be unpleasant to drink. Before degassing your wine you must first wait until the fermentation is completely finished. Do this by taking a specific gravity (SG) reading. Your wine should finish at a reading of between .996 and .990. When this range is reached and the SG remains unchanged for 2-3 days the fermentation is complete. At this point, our instructions recommend that you transfer the wine into a primary fermenter. The reason for this is to make degassing easier. If you prefer to transfer directly to another carboy, feel free to do so. Because every batch of wine is unique, the amount of CO2 in every batch you make will be different. For this reason, the time it takes to degas will vary. Sometimes, you will degas in a couple of hours or occasionally it could take as long as three days. Proceed by vigorously stirring your wine for 2-3 minutes. Notice that the wine foams up and bubbles. Allow it to settle and repeat as many times as is needed to release all the CO2. When all the CO2 is released, the wine will still bubble a little from the agitation but, it will be considerably less and there will be no foaming up.
Important: when degassing is completed, immediately go to the next step in your instructions. It is at this point that your wine becomes very susceptible to oxidization, therefore do not leave it sitting in the primary or even in a carboy with any air space. Add your stabilizers (#2 pack) and clarifiers as instructed, then top up right away. (If you were degassing in a primary you must first transfer to a carboy).
Note: To make the process of degassing easier, you can buy a tool called a “FIZZ-X” (item# 52100 $18.99)
#1 BENTONITE
The #1 add pack serves two purposes. It contains Bentonite which is a natural product derived from clay. This product is actually a fining agent and the purpose of adding this in the primary is to help pull spent yeast cells, proteins and other particles down to the bottom of your primary fermenter.
This will help improve the clarification in the later stages.
It also contains a food for the yeast. This gives the yeast a quicker start and a more vigorous fermentation. At this stage if the yeast is lacking in nutrients it could cause the fermentation not to start or to stop prematurely.
YEAST (LevosparkTM)
The yeast is what will cause the wine to ferment. Yeast is a living micro-organism.
There are many types of yeast, which have been cultured for specific purposes. It is important, for example to use wine yeast when making wine and beer yeast when making beer. Every yeast pack has an expiration date printed on the sachet. It is important to make sure that your yeast has not passed the expiration date. You can add the yeast following the method on the instruction sheet, but to get a faster start to the fermentation, it is a good idea to follow the directions on the back of the sachet.
Remember that yeast also needs oxygen to survive, so when introducing the yeast into your must it is important to stir vigorously.
#2 METABISULPHITE & ASCORBIC ACID
This pack also serves more than one purpose.
Metabisulphite acts in several ways; first, it helps fight against bacteria that may be present in the wine. Second, it is an anti-oxidant and third it is a preservative and is a very important component in the shelf life of your wine. Metabisulphite is an essential ingredient in the wine making process. It is not only used in homemade wines but it is also found in all commercial wines, often in higher levels. At Advintage, we keep the level of sulphite to a minimum in order to have as natural a product as is possible. This is one of the reasons we do not promote the use of Sorbate in our wine kits. In order to add Sorbate we would have to increase the level of Sulphite, and this is a practice that we do not support.
Ascorbic acid is an anti-oxidant. An anti-oxidant is used to help fight against oxidization. Oxidization is a natural occurrence in aged wines. How fast a wine oxidizes depends on many factors, and the addition of this component is just one-way to fight against this process. Ascorbic acid is a natural product that is actually Vitamin C.
#5 KIESELSOL (Flokul30TM)
Kieselsol is gelatine derived from natural sources, which is the first component in our two-stage clarification process. Kieselsol moves around in your wine and attaches itself to the suspended particles. The reason we must leave this product for at least 15 minutes is to give it the time it needs to attach itself to all the suspended particles. By not waiting the recommended 15 minutes, there will be many particles left in suspension that it has not adhered itself to and will in that case not clarify properly.
#6 CHITOSAN (ChitekTM)
Chitosan is a natural product and is the second component of our two-stage clarification process. After the Kiesesol has been left to do its job, the Chitosan comes in and pulls all the particles that the Kiesesol has adhered to down to the bottom. NOTE: there have been varying studies done on the potential allergies to this ingredient, and the results are not conclusive. If you have an allergy to shellfish, DO NOT use this clarifier. The two stage clarifiers can be replaced with isinglass.
#4 SORBATE
For more details about the addition of Sorbate into Advintage wine kits please see the technical page on Sorbate. The addition of the #4 Sorbate pack is ONLY to be used if you are adding a sweetener to your wine. (With the exception of our Bellissima fruit wine kits which must have the Sorbate pack added.)
1. Stable salt of sorbic acid derived from the berries of the mountain ash tree.
2. Prevents renewed fermentation in sweet wines and inhibits reproduction of mould and yeast.
3. Do not add until all fermentation is finished and the wine is clear and stable. Dissolve 1-1/2 teaspoons of Sorbate per 5-6 gallons of wine, in cool water and then stir in thoroughly.
4. Must not be added until all fermentation has ceased.
5. Sorbate present during malolactic fermentation (which often occurs during secondary fermentation of white wine) will be converted to hexanedienol (geraniol), a compound with the strong odor of geraniums. The wine is then spoiled.
*We do not recommend that you add potassium sorbate to white wine for this reason
It's really pretty easy to use the hydrometer: just follow these simple steps:
1. Sanitize the hydrometer, wine thief, and test jar.
2. Place test cylinder on flat surface.
3. Draw a sample of "clean" must or wine with the wine thief - avoid testing samples that contain solid particles, since this will affect the readings.
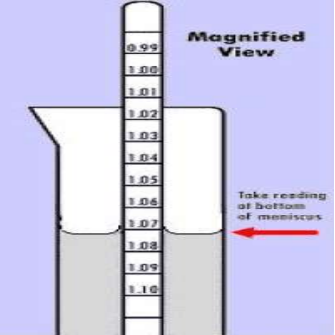
4. Fill the test jar with enough liquid to just float the hydrometer - about 80% full.
5. Gently lower the hydrometer into the test jar; spin the hydrometer as you release it, so no bubbles stick to the bottom of the hydrometer (this can also affect readings).
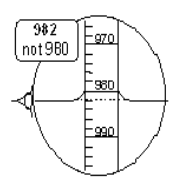
6. Making sure the hydrometer isn't touching the sides of the test jar and is floating freely, take a reading across the bottom of the meniscus (see diagram). Meniscus is a fancy word for the curved surface of the liquid.
7. Be sure to keep good records of your readings!
Use the potential alcohol scale on your hydrometer to determine the alcohol content of your wine or beer.
To increase the specific gravity (and consequently the alcohol content) add sugar. 1 cup approx. = 10 points on the S.G. scale.
These examples are to be used as a guide only. Alcohol results are approximate, due to differences in measurement & temperature.
| Example 1 Red Wine | Example 2 White Wine | Example 3 Beer |
|---|---|---|
| Date Specific Gravity | Date Specific Gravity | Date Specific Gravity |
| April 14 1.090 | April 14 1.070 | April 14 1.040 |
| April 22 1.020 | April 22 1.020 | April 22 1.020 |
| May 5 0.994 | May 5 0.994 | May 5 1.005 |
| Starting potential alcohol | Starting potential alcohol | Starting potential alcohol |
| 11.8% | 9.3% | 5.3% |
| Actual finished alcohol 12.5% | Actual finished alcohol 10% | Actual finished alcohol 5% |
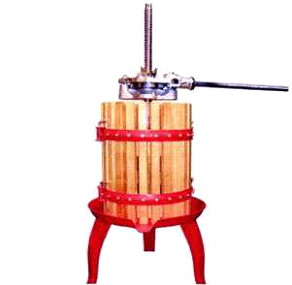
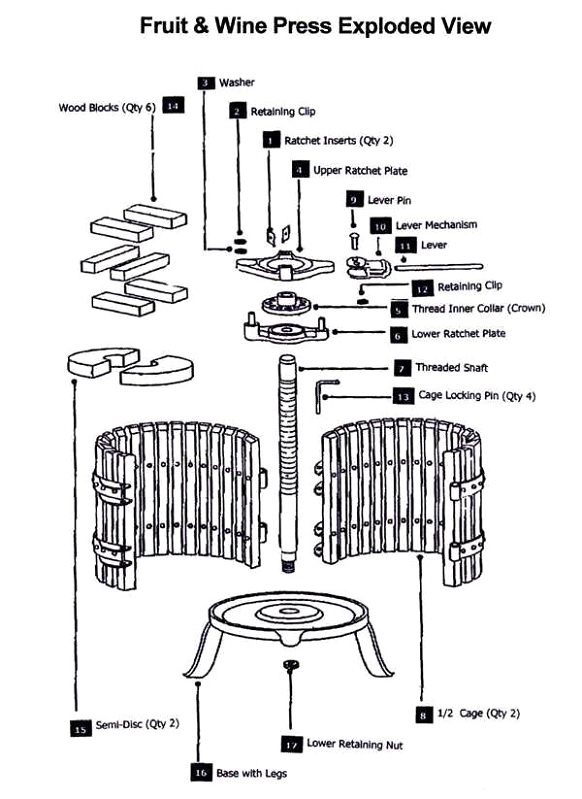
OPERATING AND ASSEMBLY INSTRUCTIONS
1. Ratchet Inserts (Qty. 2)
2. Retaining Clip
3. Washer
4. Upper Ratchet Plate
5. Threaded Inner Collar (Crown)
6. Lower Ratchet Plate
7. Threaded Shaft
8. 1/2 Cage (Qty. 2)
9. Lever Pin
10. Lever Mechanism
11. Lever
12. Retaining Clip
13. Cage Locking Pin (Qty. 4)
14. Wood Blocks (Qty. 6)
15. Semi-Discs (Qty. 2)
16. Base with Legs
17. Lower Retaining Nut
Note: Legs, base, threaded screw and ratchet mechanism come pre-assembled. Lever pin may not be inserted for shipping purposes.
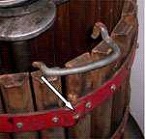
1. Insert slightly bent end into steel band.
2. Rotate Upwards
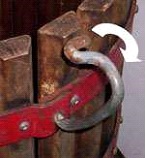
3.Once retaining pin is properly inserted into steel bands, rotate downwards, or clockwise
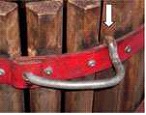
4. Lock pin over steel band.
5. Perform same operation with all the other locking pins.
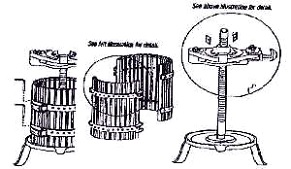
If unit is received without the lever pin inserted, follow these simple directions:
1. Fully swivel the lever mechanism counter clockwise until the lever stops.
2. Raise the lower ratchet plate and lever mechanism until the slot in the lever is even with the tab on the upper ratchet plate.
3. Swivel the lever mechanism clockwise allowing the tab in the upper ratchet place to engage the slot in the lever mechanism.
4. Continue rotating the lever mechanism clockwise slowly until the hole in the lever mechanism lines up with the hole in the tab of the upper plate.
5. Insert lever pin into the hole to lock the lever to the upper ratchet plate.
Operating instructions continued:
1. Place the 1/2 cage assemblies on the base, creating circle around the threaded screw until the hinge assemblies are mated together.
2. Place a cage locking pin in each of the hinge assemblies.
3. Fill the caged area with your favourite fruit. Leave approximately 2 inches or more of space at the top of the cage area for the semi-discs.
4. Place the semi-discs on top of the fruit, allowing them to slide inside the cage.
5. Place two wooden blocks on top of the semi discs.
Note: for best results, the blocks should be placed perpendicular to the slot in the semi-discs and kept as close to the centre screw as possible. If additional space is still present between the ratchet mechanism and the blocks, additional blocks may be stacked on top of the first set until the space is eliminated. Each set of blocks should be stacked perpendicular to the previous set. This will ensure stability suring the pressing process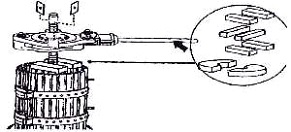
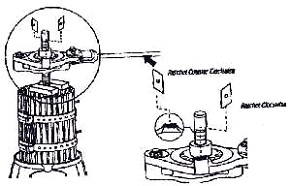
6. Spin the entire ratchet assembly clockwise until the lower ratchet place engages the top of the blocks. Continue to screw the ratchet assembly clockwise until you are unable to continue by hand.
7. Insert one insert into the slot closest to you with the point down to the left for pressing down to the right for releasing. Insert the second insert in the same way. The inserts will rotate the threaded inner collar in the direction point is facing.
HINTS FOR EFFICIENT SETUP and OPERATION OF GRAPE/FRUIT PRESS
1. Lubricate all moving parts and hinges with petroleum jelly or a food grade lubricant.
2. Place a clean sanitized container under the spout to catch the juice.
3. You may choose to line the basket with a nylon bag to contain large particles or pulp as a result of the pressing.
4. Fill the basket with grapes to within one inch of the top.
5. Place the pressing plate on the top of the grapes, followed by wood blocks placed at right angles to the plate halves.
6. Thread the ratcheting head onto the threaded shaft, set the ratchet keys to allow clockwise operation, and lower onto the wood blocks.
7. Apply pressure on the head and begin pressing by turning 2-3 turns in a clockwise direction.
8. Pause until the juice no longer runs, then continue pressing in 2-3 turn intervals.
9. Stop when the head reaches the top of the basket.
10. Reverse the ratcheting head and raise to add more wood blocks at right angles to the previous ones.
11. Lower the head to the blocks and repeat the pressing operation until all of the grapes have been reduced to 1/3 of the original volume or the ratchet turns with excessive resistance. To prevent damage to the press do not use levering devices longer than supplied with the unit.
12. Raise the ratcheting head and remove the wood blocks and pressing plate from the basket.
13. Remove the hinge pins, open the cage and remove the pomace.
14. If you wish to do a second pressing, place the pomace in a sanitized large container and break up with a ladle or large spoon and place back into the cage. Repeat the pressing cycle until all juice has been satisfactorily removed. This step is sometimes called the second run or pressing. The second pressing should be avoided if you are making wine for quality over quantity. The second pressing is of lesser quality, since some oxidization occurs and excessive tannins and harshness from the skins and pulp will be pressed into the wine.
